
Capturing the screen of your MacBook Air or iMac may be quite beneficial in so many ways.
You may capture a challenging school presentation, record an important call, visualize a bug, or document your fastest run in your favorite Apple Arcade game if you have the right app in your toolbox.
Don’t be intimidated by the thought of recording your screen. MacOS has all of the tools you need to capture a video of your Mac’s screen.
It’s so easy to do that if you know how to make a screenshot on your Mac, you’re already on your way to being an expert at screen recordings. Let us you through how to record screen on Mac with no hassle and bustle.
Reasons For You To Capture Your Mac’s Screen
Digitally speaking, each picture or video recorded from your screen is an opportunity for you to represent a complex message in an easy-to-grasp way.
This is when screen capture software comes in handy. So here are some of the cases when you should say “YES” to screen recording:
- Create video tutorials and training materials;
- Demo software functionality;
- Create presentations and reports;
- Reproduce and troubleshoot bugs;
- Facilitate client communication and collaboration;
- Capturing special moments to share with your close ones;
- Prepare and run compliance and training in regulated industries.
Regardless of your case, knowing how to record screens on a Mac is a great skill to have. And we will help you acquire this superpower.
We have prepared four short guides that will teach you to capture your Mac’s screen with the in-built apps (Screenshot Toolbar and Quick Time Player), third-party software (Movavi), and an online service (ClipChamp). So keep reading to pick an option that works best for you.
How To Screen Record On Mac With The Screenshot Toolbar
You can only use this approach if you have macOS Mojave or later. So check your macOS version and install any needed updates in order to be able to capture your screen with the Screenshot Toolbar.
Once ready, take the below steps:
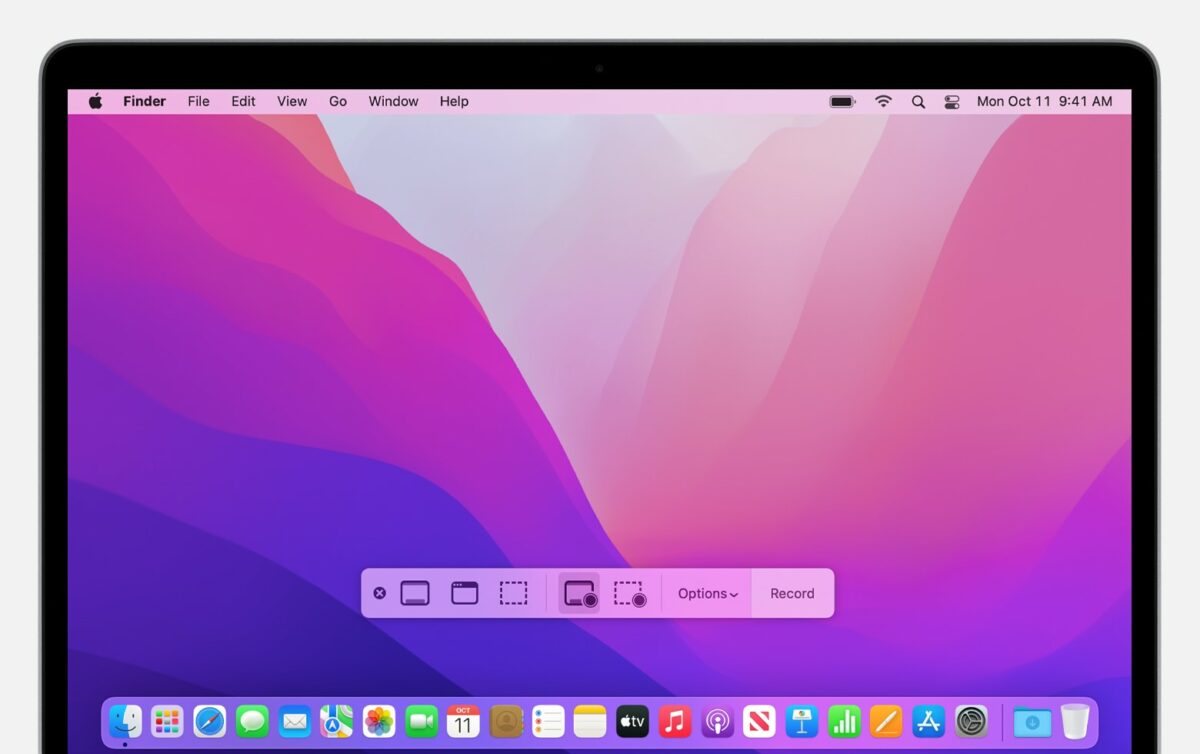
- To launch the Screenshot Toolbar, use the keyboard shortcut Command + Shift + 5. A toolbar with several icons and settings will appear at the bottom of the screen. Search for the icons with the record symbol (a solid circle). One will help you capture the full screen, while the other will enable you to record a selected area of the screen.
- Select the recording option that meets your needs. If you need to capture the designated part of the screen, make sure to mark the area of your screen you want to record and then click the Record button. To cancel a screen recording before it starts, hit the Esc key.
- Once you hit the Record button, your screen recording Mac will start instantly, capturing both a video and audio that is playing.
- To end the recording session, click the “Stop” button in the menu bar at the top of the screen.
By default, screen recordings done with the Screenshot Toolbar are stored on the desktop as.mov files. To change the storage destination, open the Screenshot Toolbar and choose from the suggested storage options.
How To Screen Record On A Mac With QuickTime Player
If you have an older version of macOS, this is the way for you to follow in order to record your PC screen. You can make use of QuickTime Player by following the below steps:
- Open the QuickTime Player app on your Mac. You can easily find it in your Applications folder.
- Once the app is launched, click the File button in the menu bar at the top of the screen.
- Hit the “New Screen Recording” button and wait for a dark gray window to show up.
A quick tip: You may need to allow QuickTime to record your screen in the System Preferences app on your Mac. If that’s the case, a window will pop up telling you how to grant permission.
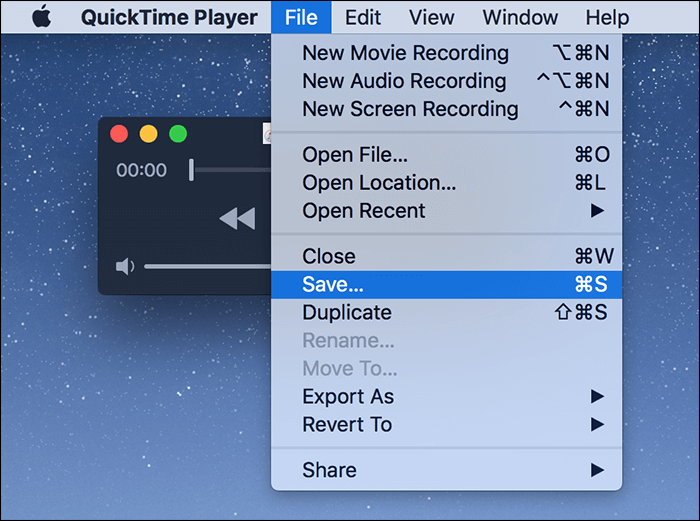
- Click the red “Record” button and then click anywhere on the screen to start recording the whole thing. You can also drag your mouse to capture a specific part of the screen if that’s needed.
How To Screen Record On A Mac With Third-Party Software (Movavi)
If you are looking for a more advanced program to record your Mac’s screen and edit the video recording when it’s ready, then Movavi Screen Recorder is your top option.
The program allows you to not only capture your screen in HD quality but also enhance the video as you need. You can even create a video on the go.

In order to make the app work for you, it is necessary to:
- Download the program and install it on your MacBook Air or iMac according to the instructions.
- Launch the program when it is installed.
- As you run the program, the sidebar will appear on the screen, and you will need to hit the icon with the video camera in order to enable screen recording. Place the video frame with the mouse to record a certain part of the screen.
- After you select the part of the screen (or the entire screen) that you want to capture, click the REC button to initiate the recording session. You will also be able to control the recording process by using the ⌥ ⌘ 1 and ⌥ ⌘ 2 hotkeys to pause/resume or stop the recording, accordingly.
- Once the recording is done, you can edit it right in the program. Movavi Screen Recorder allows for basic editing, such as cutting out the unnecessary part of the video.
- After you are done with editing, save the final video in either .mp4 or .mov format and choose the destination for the video to be stored.
By taking these steps, you will hardly have any questions about how to record your screen on iMac.
How to Screen Record on a Mac with an Online Service (Clipchamp)
As an alternative solution, you can record your screen on Mac using top online screen capturing tools, such as Clipchamp.
In this case, you will not need to download or install software on your laptop, but a registration of the site will be necessary. To screen record on a Mac with ClipChamp, you can follow these steps:
- Launch your web browser and navigate to the Clipchamp website.
- Sign in or create an account.
- Once you’re logged in, find the “Record” option or navigate to the Mac screen recorder feature (it’s located in the main menu).
- Before you start recording, adjust recording settings, such as video resolution, frame rate, audio source, and microphone input.
- Choose the area of your screen to record. You may either go for the recording of the entire screen, a specific application window, or a custom area.
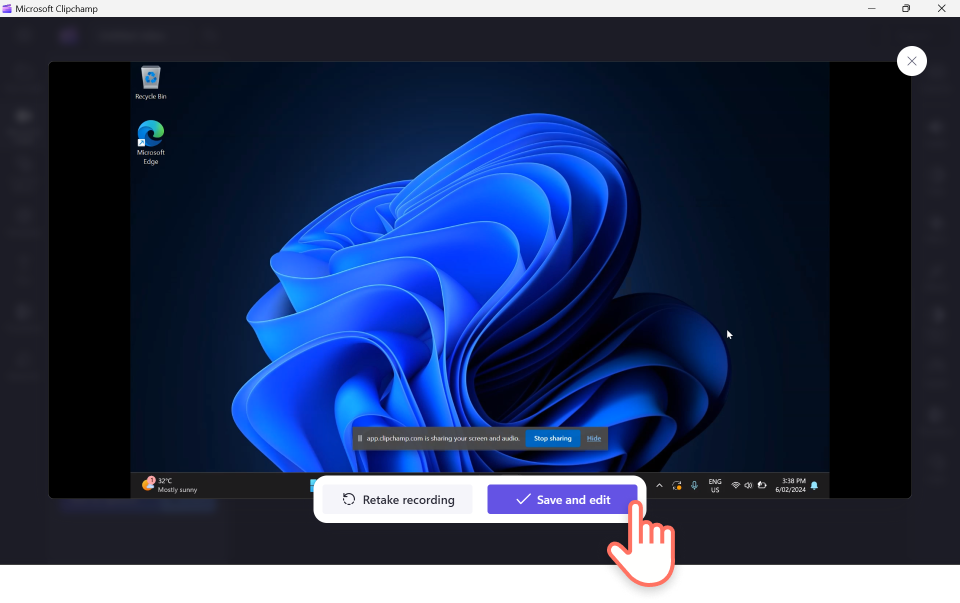
- After selecting the recording area and configuring the tool, click “Start Recording” to begin capturing your screen. ClipChamp will prompt you to grant permission to record your screen, so allow the necessary permissions.
- When you’re done recording, hit the “Stop” button to stop the recording process.
- The tool will suggest you save the video, and you will be able to select a folder on your PC for it to be saved.
Pick Your Preferred Mac Screen Recorder
It is no longer a problem to record your Mac’s screen if you are armed with any of these top 4 tools. All of them are easy to use, quite flexible, and will help you capture your Mac’s screen with ease.